Transforming a dart's shape and position has
the ability to turn a garment with a boring cut into something exciting with an
imaginative cut. After observing and creating some practice samples, we were
able to create our own bodice front that pushed the boundaries of what we had
just learnt.
Tuesday, 29 October 2013
Transformational Reconstruction
Friday, 25 October 2013
Garment - Deconstruction, Reconstruction
Pinning panels of
the deconstructed shirt and jacket together on a table first proved
effective; I stitched the shirt sleeve’s curved edge to one of the jacket’s
straight edges and this gave an outlined three-dimensional shape on the
mannequin. It fell from the shoulder quite comfortably so this is where I
positioned it; however on reflection I feel that having a large amount of
material at the waist is not very flattering.
The arched effect of the
collar on the hem is successful and contrasts with the angles on the rest of
the hem. I also like the turned-up part of the hem as it features an iconic
part of the jacket, just in an alternative way. The downfall of this is that
the panel does not look deconstructed enough and still resembles the jacket. If
I were to make this again I would have simply used the folded detail for the
hem as opposed to the entire jacket piece. The shoulder structure would have
worked better if it were moulded around an armhole, too.
Friday, 18 October 2013
Deconstruction, Reconstruction
With a second-hand tailored jacket as a starting
point, I unpicked most of the seams to reveal the panels and shapes that I was
left to work with. I began arranging them in various positions - upside down,
diagonally and upright to use the jacket's decorative detail differently.
I was
pinning the jacket panels to the stand, raising material at the shoulders and
hips to make it sculptured. After realising that by working straight on to the
stand I was restricting my work to the shape of the mannequin, I started to
work 2-dimensionally.
I
experimented by pinning curved edges of the fabric to straight edges producing
3-dimensional shapes that looked far more interesting than what I was making
before. I introduced a cut up second-hand shirt too. Draping shapes over the
stand that I had pinned together off the stand created interesting design ideas
that I could later flip, rotate or mirror to produce a final garment.
Friday, 11 October 2013
Pleating
Sharing
with us his expertise and handy tips, a business professional of fifty years held
a workshop where we learned how to create card patterns for pleats as well as
handle and experiment with some pleating samples he had brought with him.
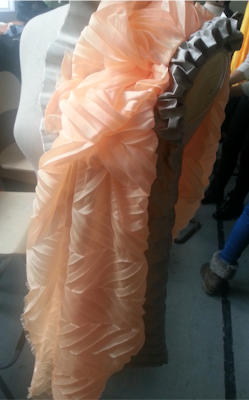
I
took advantage of the opportunity and experimented with some by working on a
stand; layering up and teaming soft, subtle pleats with harsh and more
3-dimensional ones. I like how the cube-like pleats frame the armhole, yet
contrast in both colour and shape to the ruffled V-pleats.
When
constructing a pleat pattern, attention to detail is key. I measured and marked
along a piece of card every 3.0cm then joined the marks vertically and
diagonally (both ways) with a pencil. Once I knew my lines intersected at the
same points I scored along each line. I then folded along the lines, making
"mountains and valleys" creating a V-shaped pleat. Two identical
patterns need to be made so that fabric can be sandwiched between them, and
then steamed.
Tuesday, 8 October 2013
Dart Manipulation
Our introduction to pattern cutting was based around creating interesting and unusual shapes on the stand. I began by wrapping spot and cross paper around the mannequin, pinching in areas and folding the paper so that it was as close-fitting as possible. I then coated all of the paper in tape, drew on some experimental style lines and cut down the centre back line to remove from the stand.
After cutting along the style lines to reveal my
shaped panels, I pinned them to more spot and cross paper, ensuring they were
flat. For any that did not lie flat, I cut a straight line in to the panel
towards the raised area, then measured the extension. I traced around the
panel and extended the notches. Once I had unpinned the panels, I added a 1.0cm
seam allowance to each piece, cut them out and used pattern notchers to mark
the notches. Finally, I labelled each pattern piece with relevant details,
including a grain line.
Subscribe to:
Comments (Atom)


